Developer Guide
- Acknowledgements
- Setting up, getting started
- Design
- Implementation
- Documentation, logging, testing, configuration, dev-ops
- Appendix: Requirements
- Appendix: Instructions for manual testing
Acknowledgements
- This project is based on the AddressBook-Level3 project created by the SE-EDU initiative.
- The following libraries were also used in the project.
- JavaFX for the Graphical User Interface (GUI).
- Jackson for JSON Parsing.
- JUnit5 for Testing.
- markdown-javafx-renderer for rendering the markdown.
Setting up, getting started
Refer to the guide Setting up and getting started.
Design
.puml files used to create diagrams in this document can be found in the diagrams folder. Refer to the PlantUML Tutorial at se-edu/guides to learn how to create and edit diagrams.
Architecture
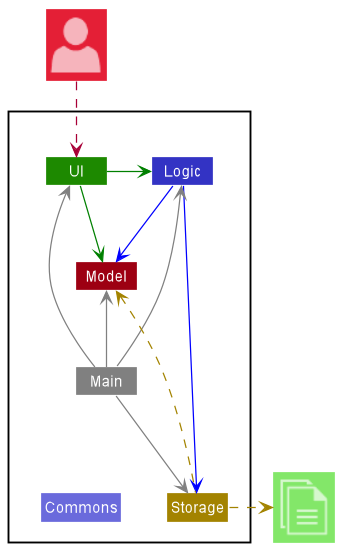
The Architecture Diagram given above explains the high-level design of the App.
Given below is a quick overview of main components and how they interact with each other.
Main components of the architecture
Main has two classes called Main and MainApp. It is responsible for,
- At app launch: Initializes the components in the correct sequence, and connects them up with each other.
- At shut down: Shuts down the components and invokes cleanup methods where necessary.
Commons represents a collection of classes used by multiple other components.
The rest of the App consists of four components.
-
UI: The UI of the App. -
Logic: The command executor. -
Model: Holds the data of the App in memory. -
Storage: Reads data from, and writes data to, the hard disk.
How the architecture components interact with each other
The Sequence Diagram below shows how the components interact with each other for the scenario where the user issues the command delete 1.
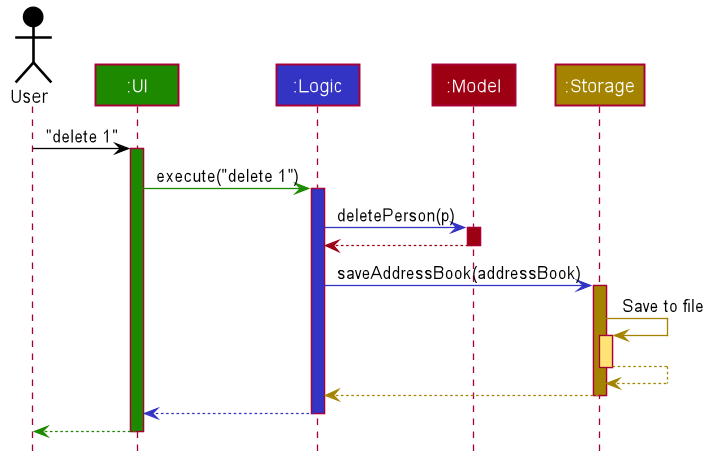
Each of the four main components (also shown in the diagram above),
- defines its API in an
interfacewith the same name as the Component. - implements its functionality using a concrete
{Component Name}Managerclass (which follows the corresponding APIinterfacementioned in the previous point.
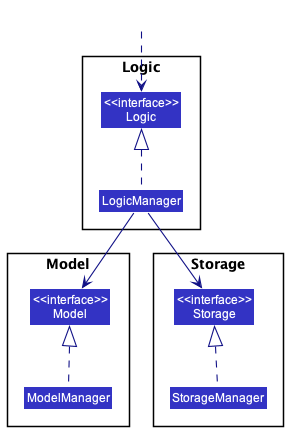
For example, the Logic component defines its API in the Logic.java interface and implements its functionality using the LogicManager.java class which follows the Logic interface. Other components interact with a given component through its interface rather than the concrete class (reason: to prevent outside component’s being coupled to the implementation of a component), as illustrated in the (partial) class diagram below.
The sections below give more details of each component.
UI component
The API of this component is specified in Ui.java
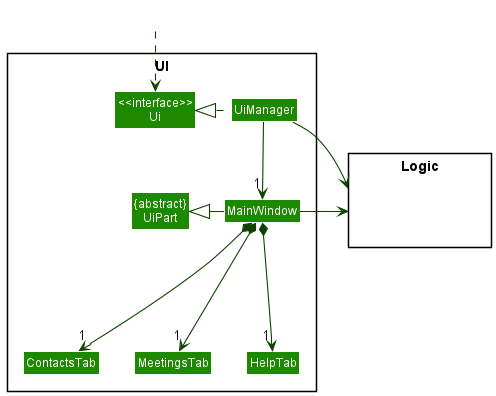
The UI consists of a MainWindow that is made up of three tabs: Contacts, Meetings, and Help.
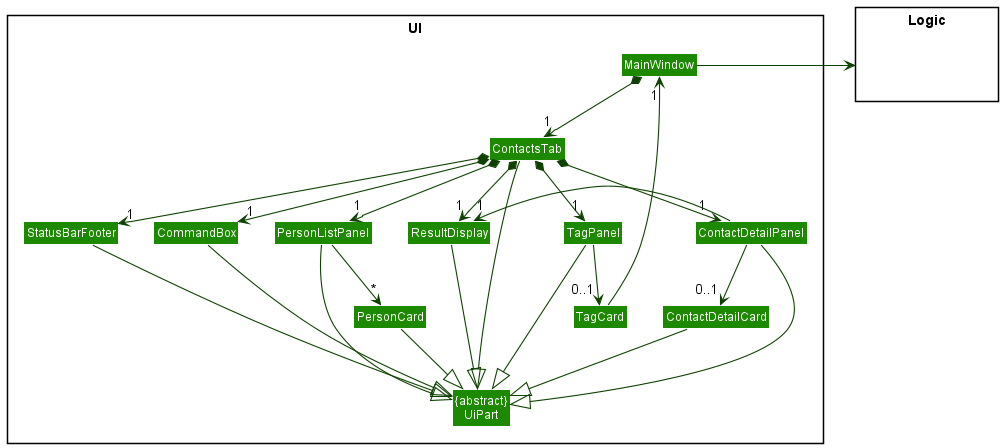
Each tab has different components. Meetings has a similar structure as Contacts except that there are no MeetingDetailPanel and MeetingDetailCard. Help contains only a MarkdownView.
All components and the MainWindow inherit from the abstract UiPart class which captures the commonalities between classes that represent parts of the visible GUI.
The UI component uses the JavaFx UI framework. The layout of these UI parts are defined in matching .fxml files that are in the src/main/resources/view folder. For example, the layout of the MainWindow is specified in MainWindow.fxml
The UI component,
- executes user commands using the
Logiccomponent. - listens for changes to
Modeldata so that the UI can be updated with the modified data. - keeps a reference to the
Logiccomponent, because theUIrelies on theLogicto execute commands. - depends on some classes in the
Modelcomponent, as it displaysPersonobject residing in theModel.
Logic component
API : Logic.java
Here’s a (partial) class diagram of the Logic component:
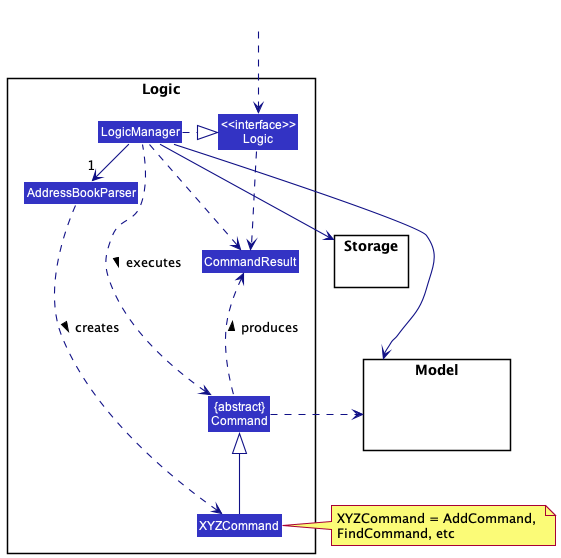
How the Logic component works:
- When
Logicis called upon to execute a command, it uses theAddressBookParserclass to parse the user command. - This results in a
Commandobject (more precisely, an object of one of its subclasses e.g.,AddCommand) which is executed by theLogicManager. - The command can communicate with the
Modelwhen it is executed (e.g. to add a person). - The result of the command execution is encapsulated as a
CommandResultobject which is returned back fromLogic.
The Sequence Diagram below illustrates the interactions within the Logic component for the execute("delete 1") API call.
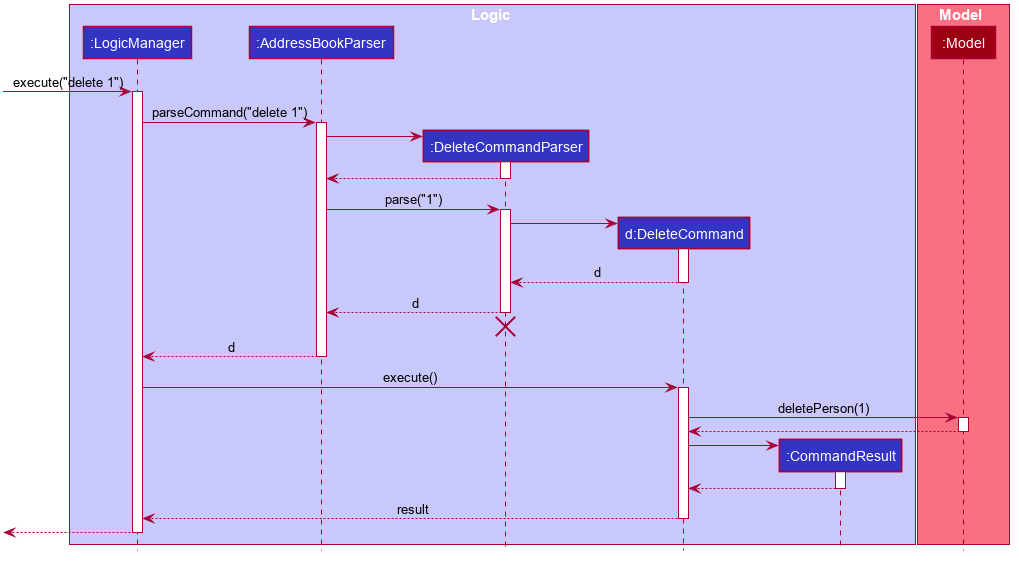
DeleteCommandParser should end at the destroy marker (X) but due to a limitation of PlantUML, the lifeline reaches the end of diagram.
Here are the other classes in Logic (omitted from the class diagram above) that are used for parsing a user command:
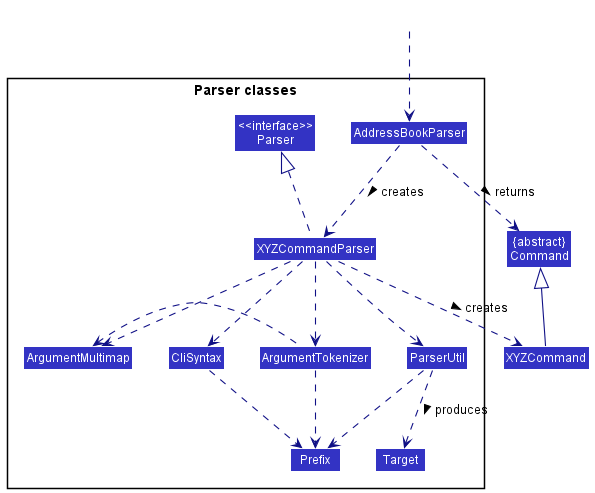
How the parsing works:
- When called upon to parse a user command, the
AddressBookParserclass creates anXYZCommandParser(XYZis a placeholder for the specific command name e.g.,AddCommandParser) which uses the other classes shown above to parse the user command and create aXYZCommandobject (e.g.,AddCommand) which theAddressBookParserreturns back as aCommandobject. - All
XYZCommandParserclasses (e.g.,AddCommandParser,DeleteCommandParser, …) inherit from theParserinterface so that they can be treated similarly where possible e.g, during testing.
Model component
API : Model.java
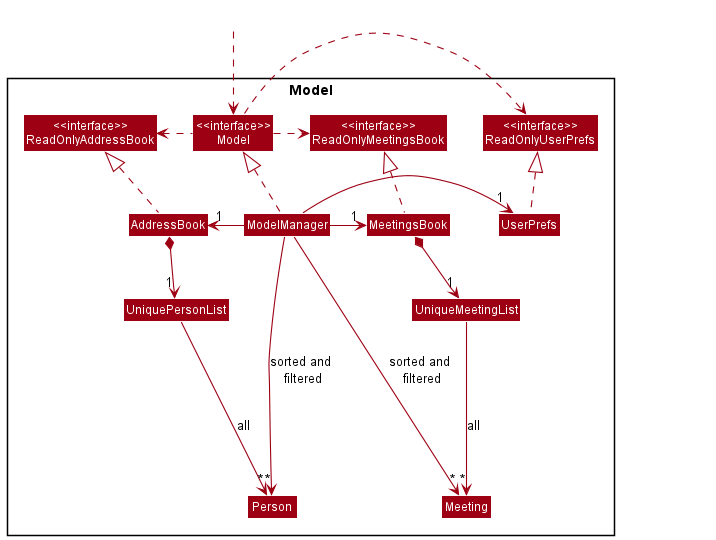
The Model component,
- stores the address book data i.e., all
Personobjects andMeetingobjects (which are contained in aUniquePersonListobject andUniqueMeetingListobject respectively). - stores the currently ‘selected’
Personobjects (e.g., results of a search query) as a separate filtered and sorted list which is exposed to outsiders as an unmodifiableObservableList<Person>that can be ‘observed’ e.g. the UI can be bound to this list so that the UI automatically updates when the data in the list change.- the same is done for
Meetingobjects.v
- the same is done for
- stores a
UserPrefobject that represents the user’s preferences. This is exposed to the outside as aReadOnlyUserPrefobjects. - does not depend on any of the other three components (as the
Modelrepresents data entities of the domain, they should make sense on their own without depending on other components)
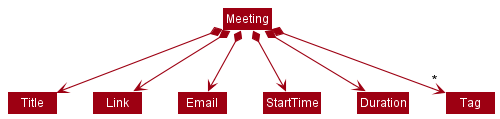
Internally, the Model component also contains other classes that model the attributes of Person and Meeting, as shown:
The Person class:

The Meeting class:
Tag list in the AddressBook, which Person references. This allows AddressBook to only require one Tag object per unique tag, instead of each Person needing their own Tag objects.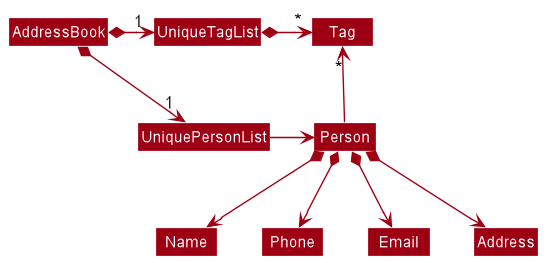
Storage component
API : Storage.java
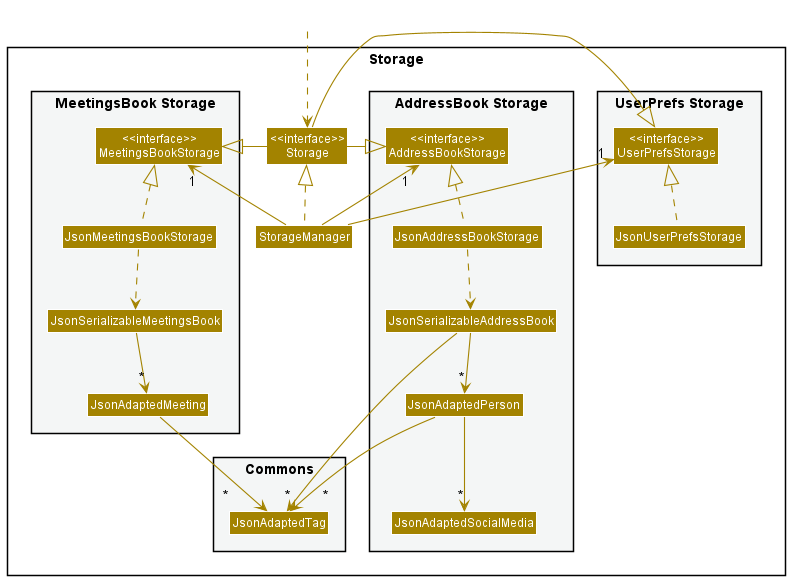
The Storage component,
- can save address book data, meetings book data and user preference data in json format, and read them back into corresponding objects.
- inherits from
AddressBookStorage,MeetingsBookStorageandUserPrefStorage, which means it can be treated as any one (if only the functionality of only one is needed). - depends on some classes in the
Modelcomponent (because theStoragecomponent’s job is to save/retrieve objects that belong to theModel)
Common classes
Classes used by multiple components are in the seedu.addressbook.commons package.
Implementation
This section describes some noteworthy details on how certain features are implemented or any features that we have in mind.
| Overview |
|---|
| Specifying targets by name or index |
| Split-panel display |
| Clickable Tags |
| Dynamic Command Text Field |
| Copy Feature |
| Adding Meetings |
| [Proposed] Undo/redo feature |
Specifying targets by name or index
uMessage allows users to perform certain indexed-based operations by specifying the index of the contact/meeting in the application. However, it is noted that users may find referring to the contact/meeting by name to be more natural, and hence uMessage also exposes certain indexed based operations to work with names as well. Some examples of indexed-based operations include:
- Adding/removing new tags from a particular person in the list.
- Deleting a person/meeting from the list.
- Adding/removing new social media information from a person in the list.
The syntax of these commands are typically:
<command_word> <INDEX or NAME> <relevant_options>
To reduce code duplication and to differentiate between INDEX and NAME, a Target class is created to handle the parsing of the INDEX/NAME string, and commands that take in a Index/Name instance will now take in a Target instance instead.
At parsing time, before the command instances are instantiated, a Target instance is instantianted with the user input. Internally, the class checks first if the input is a valid Index, failing which, it checks if it is a valid Name. If it fails both checks, then the Target class will throw a ParseException, to be caught by execute.
At this point, note that certain invalid indices are still considered valid names since names are allowed to be alphanumeric. These are the string representations of 0 and any integer greater than MAX_INT.
To prevent prematurely rejecting these strings as invalid indices, the validation for these input class will be deferred to command execution time, where the string is checked against the existing list of persons/meetings. If no person/meeting exists with the same name, then these set of inputs are treated as an invalid index and a CommandException is thrown accordingly.
Split-panel display
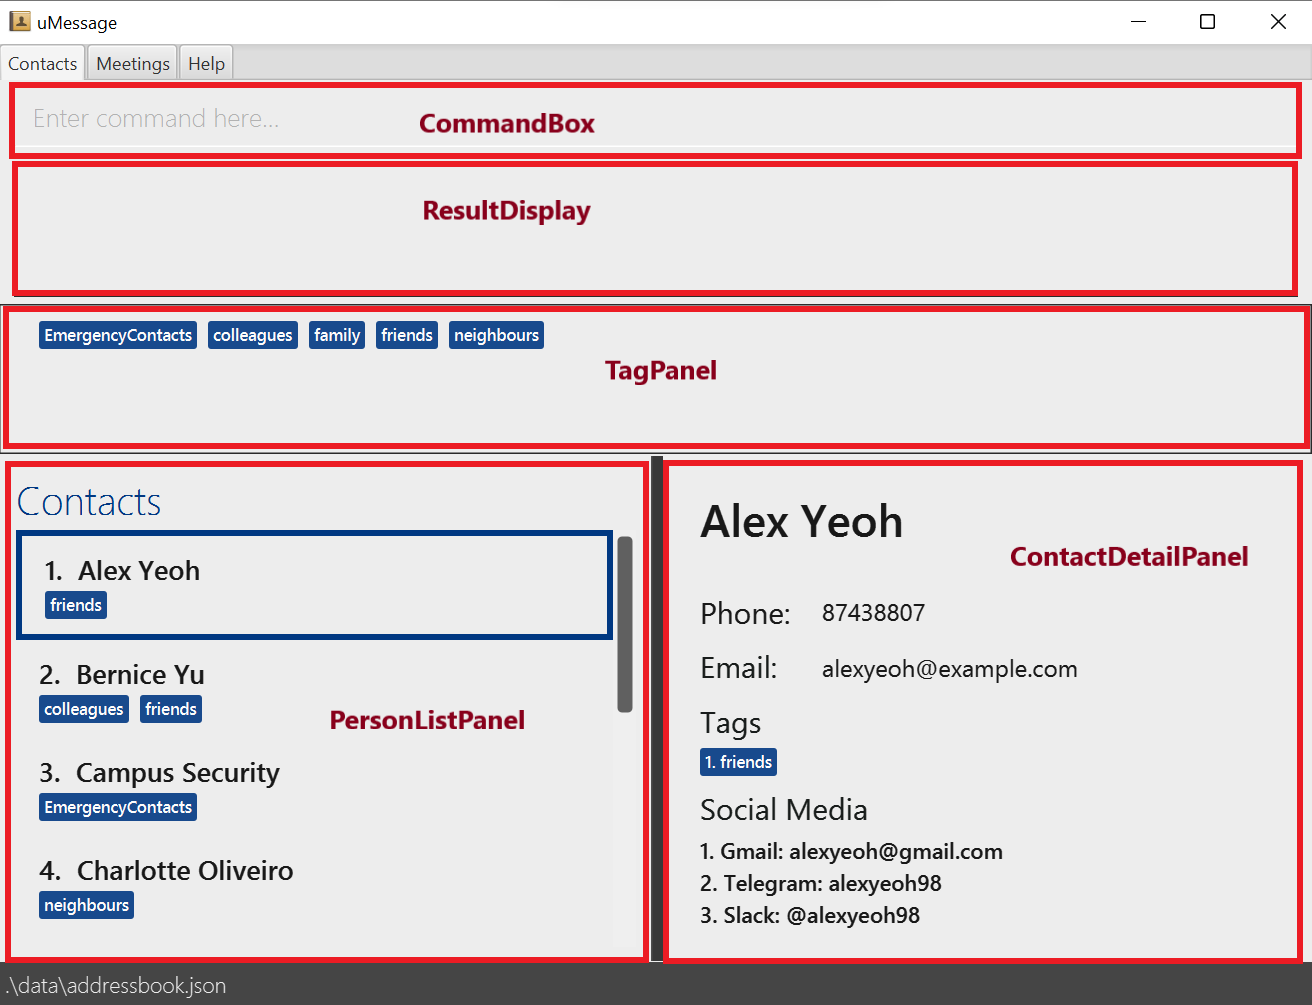
uMessage has a split view design for the contacts tab, as seen in the diagram above. On the top, we have a ResultDisplay,
which displays the result of various commands and actions performed on the application. On the left, there is a UI component PersonListPanel where users can choose and select from the list of contacts available.
On the right, users can see expanded, detailed information about the currently selected user, in a UI component called ContactDetailPanel and this panel changes based on who is currently selected on the left.
Internally, ContactDetailPanel observes a SimpleObjectProperty<Person> currentlySelectedPerson observable in the ModelManager object, and will update to display the information of the new Person whenever the value in the observable changes.
There are only a few situations that can update the observable:
- The user enters a
view INDEXcommand through the command box. - The user changes what they select on the
PersonListPanelon the left.
In the first case, the view command will retrieve the Person at the specified INDEX of the ListView, and then set this Person object as the new value for SimpleObjectProperty<Person>, and also update the ResultDisplay as well.
In the second case, the ListView within PersonListPanel has an inbuilt Selection API provided by the javafx library itself. This exposes an observable which contains the currently selected item of the ListView. PersonListPanel listens for changes to this value, and updates the SimpleObjectProperty<Person> in ModelManager whenever the selector on the ListView changes.
When the user clicks a contact in the list, the detailed information will be displayed in the ContactDetailPanel, and the message in the ResultDisplay will be updated.
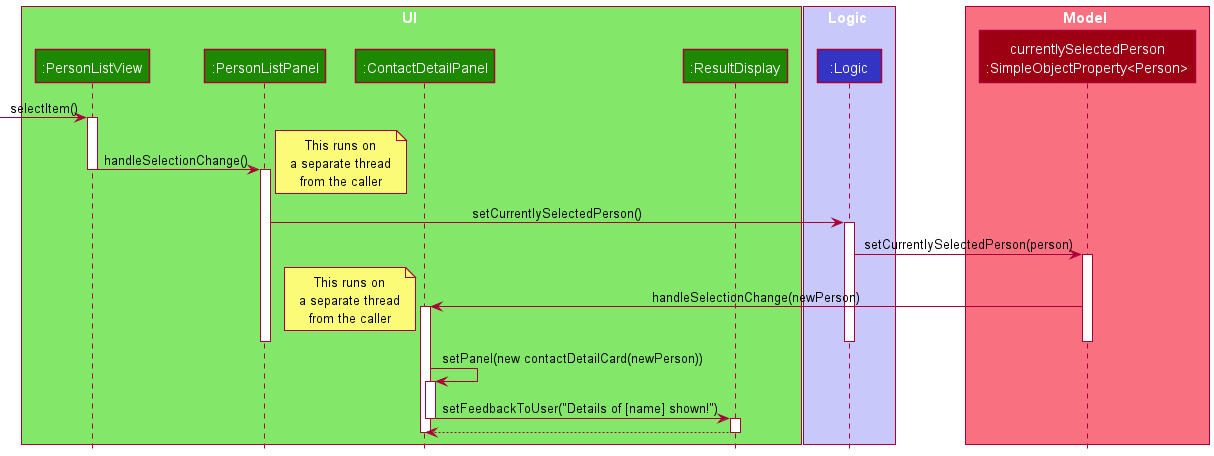
The ContactDetailPanel is responsible for informing the user through the corresponding ResultDisplay when the details have been shown successfully.
Clickable tags
When the user clicks a tag in the TagPanel, both the contact list and the meeting list will be filtered: only items that has the tag will be displayed. The number of matching items will then be updated in both contactsResultDisplay and meetingsResultDisplay.
This implementation helps the user to filter both contacts and meetings by tag easily.
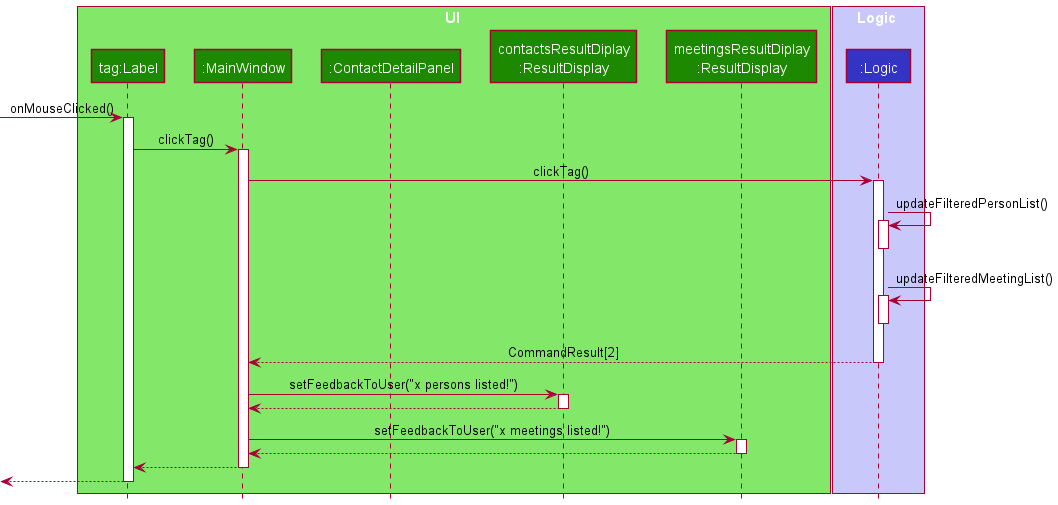
Since the effect of clicking a tag is global, each tag (displayed using a Label) will call the clickTag method in MainWindow. The clickTag method is then responsible for calling Logic to update the filtered list and updating both ResultDisplays when filtering is done.
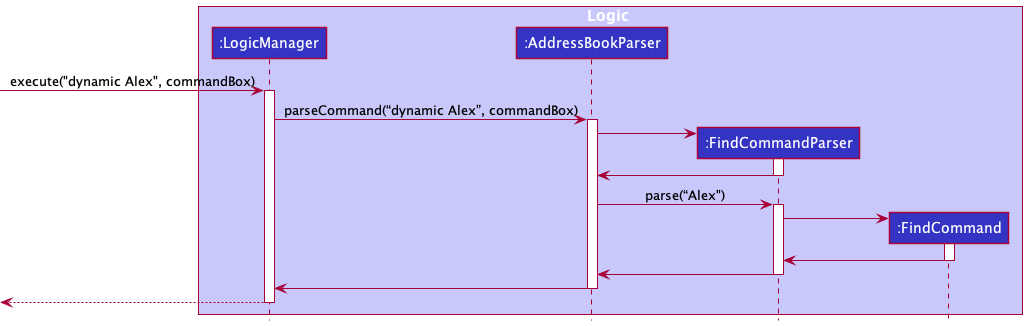
Dynamic Command Text Field
Implementation
This implementation involves enabling the CommandTextField to read input as it is typed in the Command Line Interface (CLI). In the CommandBox.java, a listener function named handleDynamicInput(), reads the user input at each deletion or addition of the command in the CLI and calls MainWindow#executeCommand. It passes the command inputted by the user with the string “dynamic” concatted to the front, and a reference of itself (a CommandBox object).
The user input and instance of commandBox object is then passed to LogicManager#execute and subsequently AddressBookParser#parseCommand and FindCommandParser#parse(arguments).
The above is assuming that the user inputs a string not included in the list of commands: “add”, “delete”, “list”, “find”, “view”, “edit”, “copy”, “clear”, “exit”, “help”.
Alternatives considered
-
Alternative 1: Continue to enable logging even during dynamic searching
- Pros: No changes needed.
- Cons: May have performance issues in terms of responsiveness.
Copy feature
Implementation
The copy mechanism is facilitated by ClipboardManager. It implements the following operation of copying the Person to the clipboard.
These operations are exposed in the Model interface as Model#copyPerson().
Given below is an example usage scenario and how the copy mechanism behaves.
Step 1. The user launches the application.
Step 2. The user call the inputs copy [PERSON]
Step 3. The CopyCommandParser implements Parser<CopyCommand> parses the command and initalizes the CopyCommand with the name of the [PERSON]
Step 4. Finally the copy command is executed and the ClipboardManager#copy is called from the model.
Design Considerations:
Aspect: Ease of copying data from uMessage:
-
Alternative 1 (current choice): Saves the entire contact book.
- Pros: Easy to implement.
- Cons: User may have to manually delete unwanted information from the contact.
-
Alternative 2: Individual copy command to copy individual information stored in the contact
- Pros: Will be easier for the user to copy information needed.
- Cons: There must be an additional input from the user after the
copycommand with the field name.
{more aspects and alternatives to be added}
Adding Meetings
In our meetings tab, users can store information about meetings. Meetings consist of the following information:
- Meeting Title
- Meeting Link
- Start Time
- Duration
Implementation
The Meeting.java class contains a reference to five separate classes, each of which encapsulate the information
about Meetings mentioned above. The Title.java class and Duration.java class stores the title and
duration of a meeting respectively. The Title.java class simply stores the title as a String while the
Duration class stores the duration as an int. The remaining two classes will be explained in more detail.
Firstly, the Link class. In Link.java, a link/url for the meeting is stored as a String.
Following the international convention, the Link Validation Regex was structured such that the domain name can
contain the English alphabet A-Z (not case-sensitive), the digits 0-9 and hyphens. However, hyphens cannot be added to
the start or the end of a domain name. In addition, users will be required to add the protocol,
http:// or https:// at the front of the link.
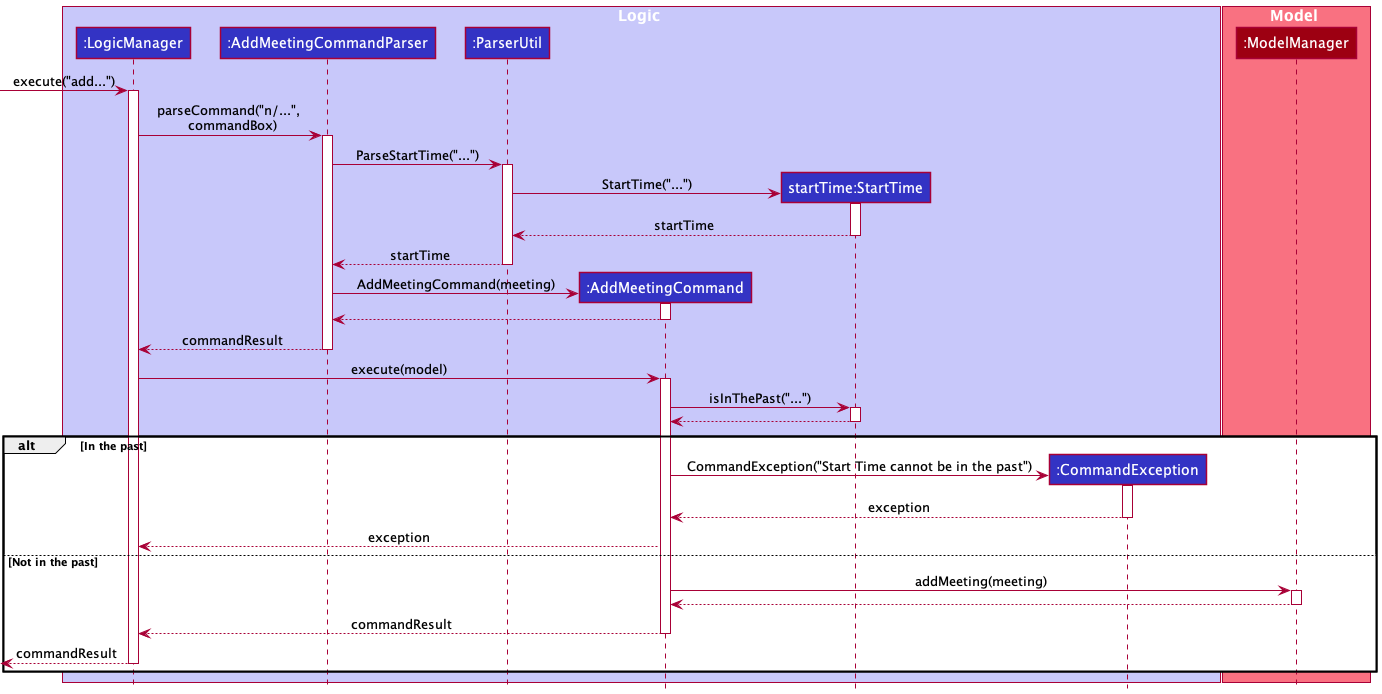
Secondly, the StartTime.java class. StartTime represents the starting date and time of a meeting.
The time and date is contained within the Java Class LocalDateTime. When a meeting is created with the relevant start
time, a StartTime object will be created inside the AddMeetingCommandParser#parse regardless of whether the start
time given is in the past, present or future.
Only when the AddMeetingCommand#execute method is executed, then the method StartTime#isInThePast will be invoked
to check if the start/time given by the user is in the past or not by comparing it with LocalDateTime#now.
If the start/time is in the past, a CommandException error will be thrown.
Below is a diagram of the sequence of actions that occur when the user inputs a start time in the past and a start time not in the past:
[Proposed] Undo/redo feature
Proposed Implementation
The proposed undo/redo mechanism is facilitated by VersionedAddressBook. It extends AddressBook with an undo/redo history, stored internally as an addressBookStateList and currentStatePointer. Additionally, it implements the following operations:
-
VersionedAddressBook#commit()— Saves the current address book state in its history. -
VersionedAddressBook#undo()— Restores the previous address book state from its history. -
VersionedAddressBook#redo()— Restores a previously undone address book state from its history.
These operations are exposed in the Model interface as Model#commitAddressBook(), Model#undoAddressBook() and Model#redoAddressBook() respectively.
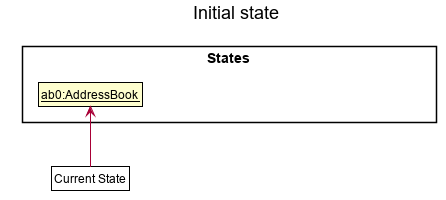
Given below is an example usage scenario and how the undo/redo mechanism behaves at each step.
Step 1. The user launches the application for the first time. The VersionedAddressBook will be initialized with the initial address book state, and the currentStatePointer pointing to that single address book state.
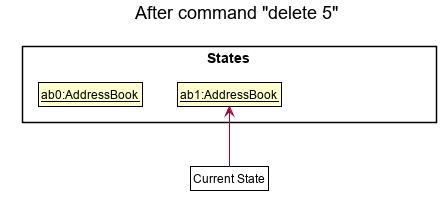
Step 2. The user executes delete 5 command to delete the 5th person in the address book. The delete command calls Model#commitAddressBook(), causing the modified state of the address book after the delete 5 command executes to be saved in the addressBookStateList, and the currentStatePointer is shifted to the newly inserted address book state.
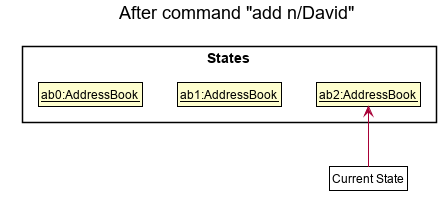
Step 3. The user executes add n/David … to add a new person. The add command also calls Model#commitAddressBook(), causing another modified address book state to be saved into the addressBookStateList.
Model#commitAddressBook(), so the address book state will not be saved into the addressBookStateList.
Step 4. The user now decides that adding the person was a mistake, and decides to undo that action by executing the undo command. The undo command will call Model#undoAddressBook(), which will shift the currentStatePointer once to the left, pointing it to the previous address book state, and restores the address book to that state.
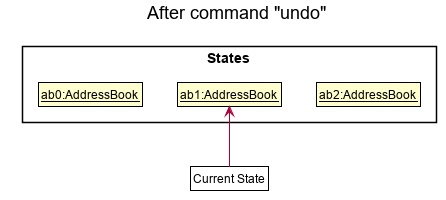
currentStatePointer is at index 0, pointing to the initial AddressBook state, then there are no previous AddressBook states to restore. The undo command uses Model#canUndoAddressBook() to check if this is the case. If so, it will return an error to the user rather
than attempting to perform the undo.
The following sequence diagram shows how the undo operation works:
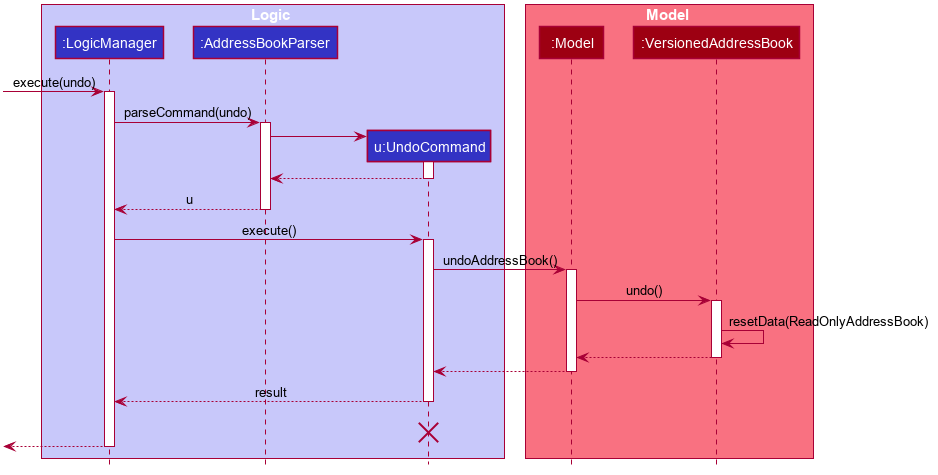
UndoCommand should end at the destroy marker (X) but due to a limitation of PlantUML, the lifeline reaches the end of diagram.
The redo command does the opposite — it calls Model#redoAddressBook(), which shifts the currentStatePointer once to the right, pointing to the previously undone state, and restores the address book to that state.
currentStatePointer is at index addressBookStateList.size() - 1, pointing to the latest address book state, then there are no undone AddressBook states to restore. The redo command uses Model#canRedoAddressBook() to check if this is the case. If so, it will return an error to the user rather than attempting to perform the redo.
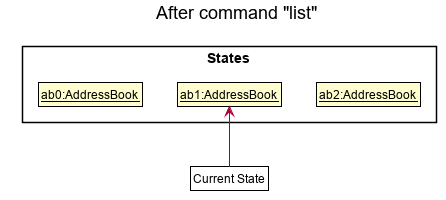
Step 5. The user then decides to execute the command list. Commands that do not modify the address book, such as list, will usually not call Model#commitAddressBook(), Model#undoAddressBook() or Model#redoAddressBook(). Thus, the addressBookStateList remains unchanged.
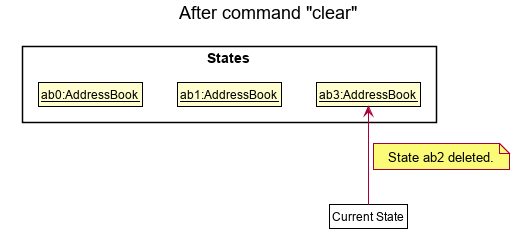
Step 6. The user executes clear, which calls Model#commitAddressBook(). Since the currentStatePointer is not pointing at the end of the addressBookStateList, all address book states after the currentStatePointer will be purged. Reason: It no longer makes sense to redo the add n/David … command. This is the behavior that most modern desktop applications follow.
The following activity diagram summarizes what happens when a user executes a new command:

Design considerations:
Aspect: How undo & redo executes:
-
Alternative 1 (current choice): Saves the entire contact book.
- Pros: Easy to implement.
- Cons: May have performance issues in terms of memory usage.
-
Alternative 2: Individual command knows how to undo/redo by
itself.
- Pros: Will use less memory (e.g. for
delete, just save the person being deleted). - Cons: We must ensure that the implementation of each individual command are correct.
- Pros: Will use less memory (e.g. for
Documentation, logging, testing, configuration, dev-ops
Appendix: Requirements
Product scope
Target user profile: A university student who:
- has a need to organise a significant number of contacts and meetings across various social media platforms
- prefer desktop apps over other types
- can type fast
- prefers typing to mouse interactions
- is reasonably comfortable using CLI apps
Value proposition: organise contacts and meetings across various social media platforms so that they can be retrieved more conveniently when needed
User stories
Priorities: High (must have) - * * *, Medium (nice to have) - * *, Low (unlikely to have) - *
| Priority | As a … | I want to … | So that I can… |
|---|---|---|---|
* * * |
student with many contacts | manage my contacts easily | |
* * * |
new user | find help on how to use the app | be more proficient in using the app |
* * * |
new user struggling to keep track of everybody’s communication channels | save people’s communication channels | find their contacts easily |
* * * |
new user | access the user guide | learn how to use the app better |
* * * |
new user | view a list of available commands | know which command to use for what I want to do |
* * * |
user | delete specific contacts | remove irrelevant information to me |
* * * |
user | delete all my contacts in one go | |
* * * |
new user | view my contacts when I open the app | see only relevant information |
* * * |
new user | add new people and their communication handles to my contacts | |
* * * |
user | add new communication handles to existing contacts | |
* * * |
university student using a lot of communication channels | organise my contacts’ communication channels neatly | see my contacts displayed neatly through GUI |
* * * |
user who likes tidy interfaces | organise my contacts neatly | |
* * * |
university student taking a lot of modules every semester | organise my module teammates into their respective labels | |
* * * |
user | look up the list of communication channels for any contact | see what options I have to communicate with that individual |
* * * |
user | update a specific handle/contact | |
* * * |
user | clear all my contacts | |
* * * |
user | list all my contacts | |
* * * |
student with many CCAs | tag contacts with CCA tags | manage my contacts better |
* * * |
student taking many modules a semester | tag contacts with modules tags | manage my contacts better |
* * * |
user | remove tags which I think are not relevant to me anymore | |
* * * |
user | search ny names or tags | |
* * * |
user who prefers typing | use a CLi interface over GUI | |
* * * |
user | separate academic and non-academic contacts | |
* * |
student with many meetings | add my meetings to my contacts | manage my meetings easily |
* * |
user | list most recently searched contacts | |
* * |
university student | find university-specific helpline contacts | contact specific helplines when I need help |
* * |
new university student | find specific university department’s contacts | contact specific departments related to specific queries/problems |
* * |
user | add additional information about any contact as extra details | |
* * |
new user | open the contacts that are saved | see the communication channels I have with that person |
* * |
user who has to keep track of a lot of meetings | save meetings so that I can keep track of them | |
* * |
university student | find a link to an online class | |
* |
student who likes to be visually stimulated | set my preferred themes of the app | |
* |
colour-blind user | view the app in colour blind mode | |
* |
student who prefers multi-tasking | resize the app window without limiting functionalities | |
* |
user | export consolidated contacts to other users |
Use cases
(For all use cases below, the System is the AddressBook and the Actor is the user, unless specified otherwise)
Precondition - User has started up the uMessage application
Use case 1: Add a contact
MSS
- User types in the command to add a person into the address book
- uMessage adds the person into the list of contacts and updates it to the user
Use case ends
Extensions
- 1a. Incorrect syntax is used
- 1a1. uMessage displays an error message
- 1a2. Use case resumes at step 1
Use case 2: Delete a contact
MSS
- User types in the command to delete a contact from the list
- uMessage removes the specified contact in the list and displays the updated list to the user
Use case ends
Extensions
- 1a. User enters an invalid syntax / a target index greater than the size of the list / a non-existing target name
- 1a1. uMessage shows an error
- 1a2. Use case resumes at step 1
Use case 3: Find Contact
MSS
- User types keyword(s) in the searchbar
- uMessage updates the contact list to display matching contacts
Use case ends
Extensions
- 1a. The first word the user types is a command word
- 1a1. uMessage displays the full list
- 1b. User deletes all keywords
- 1b1. uMessage displays the full list
- 1b2. Use case resumes at step 1
Use case 4: Copies a contact
MSS
-
User types in the command to copy a contact from the list
-
uMessage copies the specified contact to the clipboard in the list and displays the same in the
resultDisplay.
Extensions
- 1a. User does not enter a case-sensitive contact within the contact list.
- 1a1. uMessage shows an error
Use case resumes at step 1
- 1b. User enters an index
- 1b1. uMessage shows an error
Use case resumes at step 1
Use case 5: View Contact
MSS
- User types command to view a specific contact from the contact list
- uMessage displays the specific contact and all of its details in the RHS Window.
Use case ends
Extensions
- 1a. Incorrect syntax is used
- 1a1. uMessage displays an error message
- 1a2. Use case resumes at step 1
Use case 6 : Add a meeting
MSS
- User types in the command to add a person into the meetings book
- uMessage adds the meeting into the list of meetings and updates it to the user
Use case ends
Extensions
- 1a. Incorrect syntax is used
- 1a1. uMessage displays an error message
- 1a2. Use case resumes at step 1
Use case 7: Delete a meeting
MSS
- User types in the command to delete a meeting from the list
- uMessage removes the specified meeting in the list and displays the updated list to the user
Use case ends
Extensions
- 1a. User enters an invalid syntax / a target index greater than the size of the list / a non-existing target name
- 1a1. uMessage shows an error
- 1a2. Use case resumes at step 1
Use case 8: Find a meeting
MSS
- User types keyword(s) in the searchbar
- uMessage updates the meeting list to display matching meetings
Use case ends
Extensions
- 1a. The first word the user types is a command word
- 1a1. uMessage displays the full list
- 1b. User deletes all keywords
- 1b1. uMessage displays the full list
- 1b2. Use case resumes at step 1
Use case 9: Edit a meeting
MSS
- User types in the command to edit a meeting from the list
- uMessage edits the specified meeting in the list and displays the updated meeting and meeting list to the user
Use case ends
Extensions
- 1a. User enters an invalid syntax/ a target index greater than size of the list / a non-existing target name
- 1a1. uMessage shows an error
- 1a2. Use case resumes at step 1
Non-Functional Requirements
Technical:
- System should work on any mainstream Operating System, provided it has Java
11or above installed - System should be fully functional without an internet connection
Quality:
- A non-experienced user should be able to navigate and use the application as intended
- Users should be able to accomplish most tasks faster with the CLI as compared to using the mouse
- Able to run smoothly on low-end systems
Constraints:
- User has to manually type out the command using the Command Line Interface instead of using a mouse
- uMessage is able to hold up to {to be decided} contacts before experiencing a drop in performance
Glossary
- Mainstream OS: Windows, Linux, Unix, OS-X
- Private contact detail: A contact detail that is not meant to be shared with others
- Command Line Interface (CLI): A user interface whereby users interact with the program with lines of text.
- Graphical User Interface (GUI): A user interface that allows users to interact with the program with graphical components, like clickable menus.
Appendix: Instructions for manual testing
Given below are instructions to test the app manually.
Launch and shutdown
-
Initial launch
-
Download the jar file and copy into an empty folder
-
Double-click the jar file Expected: Shows the GUI with a set of sample contacts. The window size may not be optimum.
-
-
Saving window preferences
-
Resize the window to an optimum size. Move the window to a different location. Close the window.
-
Re-launch the app by double-clicking the jar file.
Expected: The most recent window size and location is retained.
-
Deleting a person
-
Deleting a person while all persons are being shown
-
Prerequisites: List all persons using the
listcommand. Multiple persons in the list. -
Test case:
delete 1
Expected: First contact is deleted from the list. Details of the deleted contact shown in the status message. Timestamp in the status bar is updated. -
Test case:
delete 0
Expected: No person is deleted. Error details shown in the status message. Status bar remains the same. -
Other incorrect delete commands to try:
delete,delete x,...(where x is larger than the list size)
Expected: Similar to previous.
-
Saving data
-
Dealing with missing/corrupted data files
- To simulate a missing file, delete the
datafolder, or some of the.jsonfiles within it. Thisdatafolder is located in the same directory where the application jar is placed.
Upon launch, the application will generate a new
datafolder with initial application data.- To simulate a corrupted file, edit some of the text data found within the
.jsonfiles. This application will determine if the corrupted json file is still parseable, and handle accordingly. If the data files are determined to be corrupted, the application will wipe the data files, causing it to start from a clean slate upon saving.
- To simulate a missing file, delete the